
Introduction
There’s something undeniably comforting and deeply satisfying about a perfectly cooked piece of crispy chicken. It’s a dish that evokes childhood memories, simplifies weeknight dinners, and always delivers on flavor. But achieving that coveted golden-brown, shatteringly crisp skin while keeping the meat juicy and tender can often feel like a culinary challenge reserved for professional chefs. Fear not, home cooks! This Crispy Skillet Chicken recipe is here to demystify the process and bring restaurant-quality results right into your kitchen with minimal fuss and maximum flavor.
Imagine sinking your teeth into chicken where the skin crackles with every bite, followed by succulent, moist meat that’s bursting with savory goodness. That’s precisely what this recipe promises. We’re going back to basics, utilizing the magic of a hot skillet and a few simple techniques to transform everyday chicken pieces into a culinary masterpiece. It’s a dish that’s both elegant enough for a special occasion and straightforward enough for a busy Tuesday evening. Get ready to impress yourself and your family with this incredibly delicious and surprisingly easy Crispy Skillet Chicken.
The beauty of cooking chicken in a skillet lies in its efficiency and the incredible crust it develops. Unlike baking or deep-frying, pan-frying in a skillet allows for precise control over the browning process, ensuring an even, deep golden crisp without excessive oil. This method renders the fat from the chicken skin beautifully, turning it into a flavorful, delicate layer that protects the meat from drying out. This recipe focuses on bone-in, skin-on chicken thighs, which are inherently more flavorful and forgiving, guaranteeing a juicy outcome every time. Prepare to make this a staple in your dinner rotation!
Nutritional Information
Per serving (approximate values):
Calories: 480
Protein: 40g
Carbohydrates: 10g
Fat: 30g
Fiber: 1g
Sodium: 650mg
Ingredients
4 bone-in, skin-on chicken thighs (about 2-2.5 lbs total)
1/2 cup all-purpose flour
1 tablespoon smoked paprika
1 teaspoon garlic powder
1 teaspoon onion powder
1/2 teaspoon black pepper
1 teaspoon salt (or to taste)
1/4 teaspoon cayenne pepper (optional, for a kick)
2 tablespoons olive oil (or other high-smoke point oil like avocado or grapeseed)
2 tablespoons unsalted butter
2 sprigs fresh rosemary
3 cloves garlic, smashed
Instructions
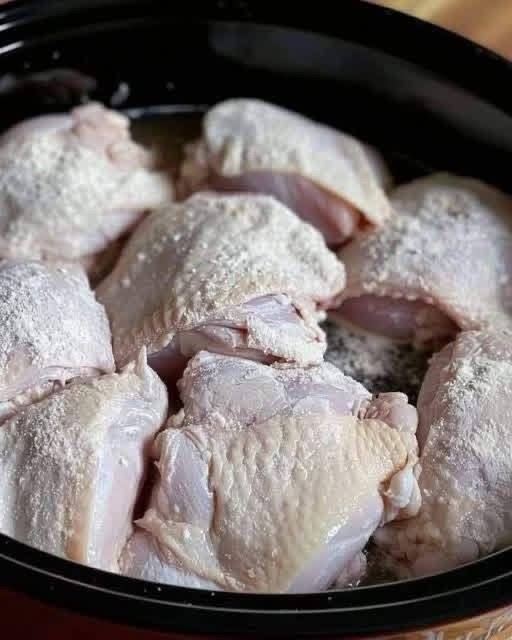
Prepare the Chicken: Remove chicken thighs from their packaging and pat them thoroughly dry with paper towels. This step is absolutely crucial for achieving crispy skin, as excess moisture prevents proper browning. Trim any excessive fat from the edges of the thighs, but leave the skin intact.
Season the Chicken: In a shallow dish or a large plate, combine the all-purpose flour, smoked paprika, garlic powder, onion powder, black pepper, salt, and optional cayenne pepper. Mix well to ensure all spices are evenly distributed throughout the flour.
Dredge the Chicken: One by one, dredge each chicken thigh in the seasoned flour mixture. Make sure to coat all sides evenly, gently pressing the flour onto the chicken to adhere. Shake off any excess flour. Place the coated chicken thighs on a clean plate or a wire rack set over a baking sheet, ensuring they are not touching, while you prepare the skillet.
Heat the Skillet: Place a large, heavy-bottomed skillet (preferably cast iron or stainless steel) over medium-high heat. Allow the skillet to heat for 2-3 minutes until it’s hot but not smoking.
Add Oil and Sear First Side: Add the olive oil to the hot skillet. Swirl to coat the bottom. Carefully place the chicken thighs, skin-side down, into the hot oil. Ensure there is enough space between each piece; if your skillet is not large enough, cook in two batches to avoid overcrowding, which can lower the pan temperature and steam the chicken instead of searing it.
Cook Skin-Side Down: Reduce the heat to medium. Let the chicken cook undisturbed for 8-12 minutes on the skin side. Do not move the chicken during this time. This extended cooking time on the skin side is essential for rendering the fat and developing that deep, golden-brown, crispy crust. You’ll know it’s ready to flip when the skin is deeply golden and easily releases from the pan.
Flip and Add Aromatics: Once the skin is beautifully crispy and golden, flip the chicken thighs over. Add the unsalted butter, fresh rosemary sprigs, and smashed garlic cloves to the skillet. The butter will melt and baste the chicken, and the aromatics will infuse wonderful flavor into the oil and chicken.
Finish Cooking: Continue to cook the chicken on the second side for another 10-15 minutes, periodically spooning the melted butter, garlic, and rosemary over the chicken to baste it. Cook until the internal temperature of the thickest part of the chicken (without touching the bone) reaches 165°F (74°C) on an instant-read thermometer.
Rest the Chicken: Once cooked through, remove the chicken thighs from the skillet and transfer them to a clean plate or cutting board. Tent loosely with aluminum foil and let them rest for 5-10 minutes before serving. This resting period allows the juices to redistribute throughout the meat, ensuring maximum tenderness and juiciness.
Serve: Serve your Crispy Skillet Chicken immediately with your favorite side dishes.
Cooking Tips and Variations
Achieving truly crispy skillet chicken is all about technique and paying attention to a few key details. Firstly, the importance of patting the chicken dry cannot be overstated. Any surface moisture will create steam when it hits the hot pan, preventing the skin from crisping up. Use plenty of paper towels and ensure the chicken is as dry as possible before seasoning and dredging. Secondly, don’t overcrowd your pan. If you try to cram too many pieces of chicken into a single skillet, the temperature of the pan will drop significantly, leading to steaming rather than searing. This results in flabby skin instead of crispy. Cook in batches if necessary, even if it adds a few extra minutes to your total cooking time, the results are well worth it.
ADVERTISEMENT
